Preparing for Backcountry Skiing and Riding

Backcountry Skiing and Riding is a fun adventure but needs to be taken seriously. Our friend Ellen Hollinshead, an experienced outdoorswoman, has some solid tips for those planning their outdoor escape.
When the ski areas closed in March of 2020 due to Covid, skiing was at its prime. Suddenly, almost everyone became a backcountry skier or rider. Backcountry ski shops, terrified that their business might have to shut down, actually ended up selling out of backcountry clothing and gear. Winter Trailheads that rarely saw more than a few cars became a parking nightmare. Experienced backcountry skiing and riding folks grew frustrated with all the newbies out there making basic mistakes on everything from route finding, to avalanche awareness, and even just your basic backcountry etiquette. The Colorado Avalanche Information Center (CAIC) increased its presence on its website with more reports from the backcountry and social media had heated discussions on how crazy the backcountry had become and what to do about it.
I started backcountry skiing thirty years ago on skinny telemark skis when there was no internet and really no one else out there other than weekends on Baldy Mountain, just outside of Breckenridge. I took an avalanche class just after two friends had died backcountry skiing on Mt. Guyot and most of what I remember from that class was to avoid avalanche terrain at all costs. Over the years, and through trial and error I figured out the do’s and don’ts of backcountry skiing mostly on my own. Yes, we triggered small avalanches, but not very often and luckily we never got caught. Our skin tracks back then were poorly constructed, and skiing down on our skinny skis was more about survival than making pretty turns and conserving the powder.
This winter, the backcountry ski scene has exploded but it has become a little frustrating for many of us old-timers. Too often, I want to give someone advice, but I am hesitant to speak up because I don’t want to offend anyone. So here goes. I can’t give you a full rundown on everything there is to know about backcountry skiing, but these are a few tips that I feel strongly about and many are not something you might have heard before.
Let’s start at home…
CHECK THE CAIC FORECAST.
Even if you’re not thinking of skiing near avalanche terrain, you should have a handle on the weather for that day and the CAIC gives the best weather forecast for the backcountry. It will tell you wind speeds and directions which is critical for deciding where to ski. It rates and describes the avalanche danger, gives new snowfall amounts from various sites other than ski areas, and tells you the temperature for 11,000 feet. I read all the field reports to get a sense of what the skiing could be like in my zone, Vail/Summit County. I look at it every single day. And once you realize how valuable the CAIC is, please consider donating to Friends of CAIC and taking an avalanche class.
STUDY A MAP.
Way too often I meet people who have no idea where they are going which is always shocking to me as someone who loves to explore and is map obsessed. I have four giant boxes in the closet filled with topo maps and I have spent hours looking at them before heading out somewhere new. Up until recently, I always carried a topo map. Nowadays I mostly rely on my Gaia GPS app where I have downloaded topo maps of all of Colorado’s mountains. It has this nifty feature of showing you how steep the terrain is so you can plan ahead of time where you need to be careful, especially if the steep terrain is hidden above you as you skin up a valley floor. I study it before I leave the house so I don’t have to keep pulling my phone or map out to check. It also tells you exactly where you are at that moment which is helpful if you are lost. Sometimes I will carry a paper map as well, in case my iPhone battery dies.
PUT YOUR SKINS ON AT HOME AND TURN ON YOUR BEACON.
Usually, it is cold and crowded at trailheads and you just want to get going. We always put our skins on in the warmth of the living room where you can take the time to make sure they are aligned properly and sticking well. If you turn on your beacon at home, it will tell you if it is time to change the batteries which isn’t something you want to find out at a trailhead. Plus, it is good to just get into that routine so that when you are in a hurry at the trailhead you don’t have to remind yourself to turn it on. I confess, there have been a few times I forgot to turn it on and then realize later I wasn’t transmitting, luckily these were days with low avalanche danger. An experienced skier who died in an avalanche a couple of years ago forgot to turn on his beacon and his partner couldn’t find him. What a horrible situation. Try to get into the routine of doing a beacon check at the trailhead.
WHAT TO HAVE IN YOUR PACK.
There is all the obvious stuff – a puffy, goggles, neck gator, extra warm gloves, first aid kit. But here are a few suggestions that aren’t so obvious.
Two extra-long ski straps –
Once at the top of a steep couloir, my important buckle broke on my boot and I used a long Voile ski strap to tighten my boot. I couldn’t believe how well it worked. Also, two ski straps can be used when the glue on your skins fails.
A small penknife –
I always carry a small multi-tool with me. Sometimes ice builds up under your pin bindings and a little knife will clean it out. Once, during an intense storm in the Tetons, the zipper on the goggle pocket of my pack froze but I had 3000 feet of descending ahead of me and I had to wear goggles. So yes, I ripped a hole in the pocket so I could pull them out.
A visor or a ball cap –
This is actually more about snow than the sun. If it is snowing hard and you are heading uphill and don’t want to wear goggles or glasses because they fog, you need to have some kind of visor or ball cap that will keep the snow out of your eyes and off your face. I actually prefer just strapping a visor around my wool hat on cold days so that I stay warm and can easily whip it off when I need to put on goggles, but I am not a slave to fashion and this does look a little dorky, so if that isn’t you, just carry a warm ball cap. If you run hot as I do, I also use the visor on warm days and make sure that my first layer is a hoodie so I can pull the hood up for extra sun protection if needed.
A bivy sac –
a friend broke his leg out in the middle of nowhere, and the bivy sack saved his life so that he could stay warm while waiting a few hours for help. They weigh almost nothing. Get one. $20 at Mountain Outfitters.
A slope meter –
the one guarantee we have with avalanches is that they don’t happen on slopes less than 30 degrees. I carry one in my hip pocket so it is easily accessible and enjoy testing myself to see if I guessed correctly how steep the slope is. You’d be surprised that 30 degrees isn’t that steep of a pitch.
Skin and ski wax –
when spring arrives, and the temperatures warm up, snow tends to glop onto your skis and skins and it can be a dangerous issue if you are far from the car and you cannot move because of the five inches of snow stuck on your ski. Usually, from mid-February on, I carry these two items in my pack.
ON THE WAY UP.
Probably my biggest frustration for many years has been the prevalence of poorly designed skin tracks. Unfortunately, the more popular a location, the worse the skin tracks seem to be these days.
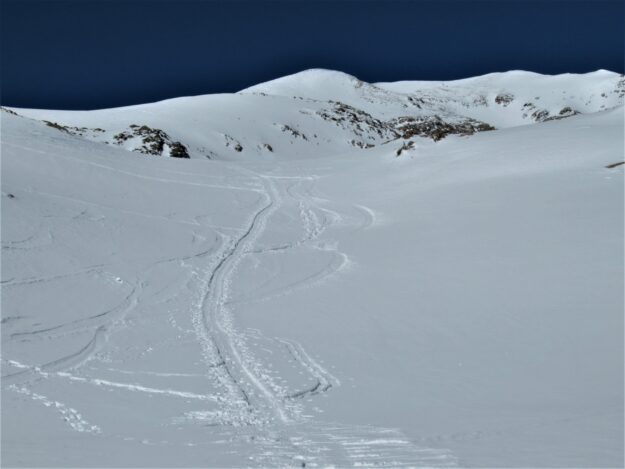
The most common mistake is when the skin track goes right up through the heart of the descending terrain (above) I get it. You look up and see this open slope with ski tracks and figure that’s where you need to go, so you put your head down and head up. But now you have to contend with skiers coming down right at you and who wants to ski over a deep rut of a skin track? Plus, the space your skin track takes up is often the equivalent of three or four ski lines now wasted.
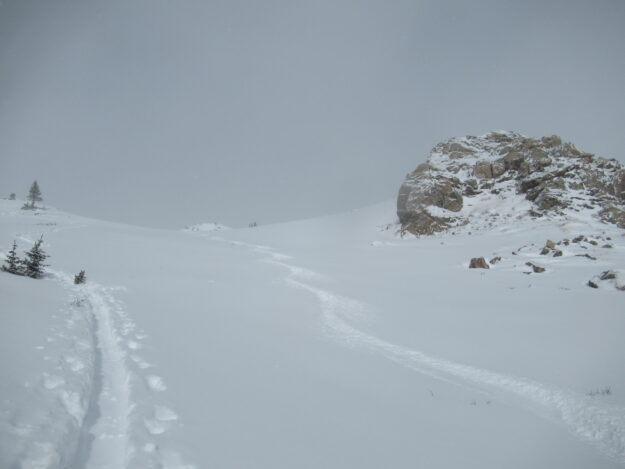
If you are the one breaking trail, look up often and ask yourself, would someone like to ski this area? Am I in the way? Keep your skin track out of the ski terrain (like the picture above) even if it isn’t where you were thinking of skiing, or if that isn’t possible then just try to hug the borders of the ski terrain. Skin up through areas where people probably won’t be skiing – like shallow snow, or through dense trees, willows, boulders, ridges.
I also have noticed quite a few skin tracks at popular locations traveling under avalanche paths. Often the danger is low, but when people are accustomed to the skin track going a certain direction, they will return to that spot and go the same way. Please, even if the avalanche danger is low, put your skin track in a safe location for future users.
Try to keep the skin track mellow. Some people seem to like skinning straight uphill, and yes, it might be faster, but it is hard on your back and hips and personally, I find it incredibly boring because you are forced to look down at your skis rather than, if you kept it just a little more sideways, you could enjoy the scenery. I rarely use my highest heel lift unless I’m in deep snow and maneuvering around trees or rocks. As you skin uphill, occasionally look below to make sure that your skin track footprint is only using a small section of terrain. Avoid kick turns by looking ahead so that you make a gentle turn where the terrain isn’t as steep.
FEEL THE SNOW.
Get a routine down for switching to downhill mode. There are some people that take forever to get ready and then there are those who treat it like a race. I fall somewhere in between. Give yourself a little room from your friends so that when you whip that skin off from the bottom of your board or ski it doesn’t smack them in the face. I won’t go into details here, but it is worth learning how to leave your skis on while taking off your skins. It is faster and also safer if you are standing on a side slope where you might have trouble getting back into your skis.
AT THE TOP.
Get a routine down for switching to downhill mode. There are some people that take forever to get ready and then there are those who treat it like a race. I fall somewhere in between. Give yourself a little room from your friends so that when you whip that skin off from the bottom of your board or ski it doesn’t smack them in the face. I won’t go into details here, but it is worth learning how to leave your skis on while taking off your skins. It is faster and also safer if you are standing on a side slope where you might have trouble getting back into your skis.
AND THE FUN PART, SKIING DOWN.
Take it slow –
Probably the number one problem I have had with novice backcountry skiers who are expert ski area riders is that they descend way too fast. Backcountry snow is full of surprises and there are plenty of hidden obstacles and variable snow where speed is not your friend. One moment you could be dancing through the powder and then suddenly it transitions to breakable crust. Take it slow. Finish your turns. Show respect.
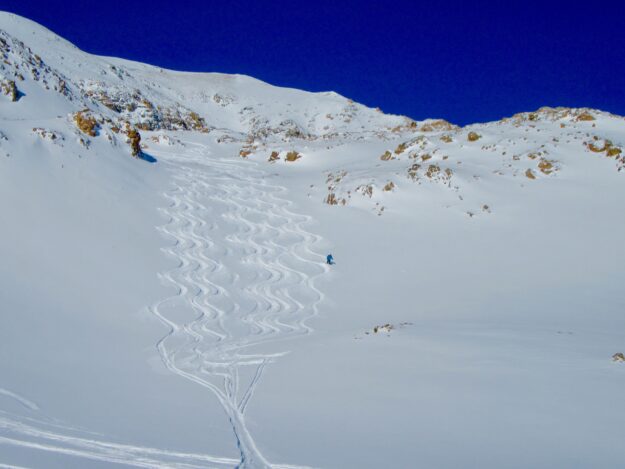
Conserve the Powder –
Especially this busy, low snow season, fresh tracks, a big reason why we are all out there, are becoming harder to find. When I ski with a couple of friends, we ‘farm’ or ‘spoon’ our turns (Picture 4), keeping our turns close to each other, almost in sync, so that the next person can have a fresh line.
BACK AT HOME.
We usually bring our skis inside so the bindings can dry out. Take your skins out of your pack as soon as you are home and hang them up somewhere to dry. Turn off your beacon. Download your photos and re-live the amazing day you just had. And here’s one piece of advice mostly just for me, put on some mellow music, roll out the yoga pad, and stretch those quads!
by Ellen Hollinshead
Backcountry Skiing and Riding is a fun adventure that needs to be taken seriously. Enjoy this big beautiful backyard here in our Colorado mountain towns. Make a plan and always be cautious.
Stay in touch with Colorado’s Mountain Town Events:
www.mtntownmagazine.com/events-calendar
*****
MTN Town Media Productions | Celebrating the Colorado mountain lifestyle
Copyright 2021 MTN Town Media Productions all rights reserved.
Post Sponsored by